


Homemade slippers
If there is one thing I love coming home to is a cosy pair of slippers. Urgh, it is like you are walking on clouds. Due to this (and the fact that my current slippers are in desperate need of a wash) I thought 'why not try to make some from scratch'!
Of course, I did whatever normal human being would do, I made them and boy, they were hard but the results came out super duper cute!
So here is 'Homemade slippers'...


 |
| Let's do this! |
So here is 'Homemade slippers'...
What you will need:
Material (a fabric for the outside and fabric for the lining-the inside) (you need enough for the slipper's base and the curve)
Scissors
Pins/needles or sewing machine
Thread
Fabric pen
Measuring tape
A normal pen and paper
Fabric Glue
Ribbon (optional)
What to do now:
1. Take your normal pen and paper and draw around one of your feet then cut the outline out, this is the base of the slipper.
2. Next up, pin your foot outline template onto the fabric- the outer material should be placed inside the lining with both of the correct sides facing each other for both. I folded the material in half so I would create two. If you wish, you can draw around the template with fabric pen if that helps.
3. Now to cut around this but leaving at least a couple of cms for when you sew it together. You have your slipper's bases wooo!
But, you need to cut out two more foot bases of the lining material only! Put these aside for later.
 |
| After steps 1,2,3 Cut out two slipper bases by drawing around your foot and cutting out the chosen fabric. |
4. Remove the pins and take the paper away but don't throw it away as you will need it again. Re-pin as quickly and as gently as you can, trying not to move the material around (if you do, don't worry, try to line them all up). Put this to one side for later.
5. Take the foot template and pin it to the folded material left overs, it is now time to make the curve of the slippers! Add at least 5cms or at least enough to cover the curve of your foot and for seam allowance. Once you are happy, cut it out. We aren't done with this yet bit yet. Measure out your ankle to wherever you want your slippers to rest on your foot. Draw around the measuring tape circle as best you can on the cut out material, positioning it towards the heel of the shape. Cut this out, you now should have two bigger foot shaped cut outs.
 |
| After step 5 This shows the original foot, for the bases of the slippers, and the bigger cut out for the curve of your foot, with a hole to put your foot in! |
6. Again, making sure right sides are together, pin the fabric as secure as you can. Don't worry, this should create a little hill because of the bigger pieces. You will see the rough shape and size of your slippers. Carefully place your foot inside and adjust if it is too tight or too loose for you.
 |
| After step 6 You can see the curve of the foot once the two pieces have been pinned together |
7. Once you have done this, sew all the way around the slippers, either using a sewing machine or hand stitched. I did the latter. Cut off any excess material off and using the fabric glue, spread a little bit around the edges just to secure it down. You do not need too much of this. Leave this to dry.
 |
| After step 7 Once you have sew all the way round the slippers, cut off any excess material and place a little glue to secure it further around the edges! |
8. Turn inside out, add a little glue around the curve edges, again just to secure it in place.
Grab the two lining foot bases you did earlier and place inside the now turned out slippers, cut off any excess and glue in place. Leave to dry.
 |
| After step 8 Once the glue has dried, turn right side out and round the curve of the slipper, add a little glue again to secure it. |
9. Taking the fabric glue again, create little dots on the base of the slipper as this gives them a little bit of a grip.
10. This step is optional but I made little ribbon bows to go on the front to give it more vintage feel so you can do this too if you wish. And voila, you have made some slippers!
And the final product...


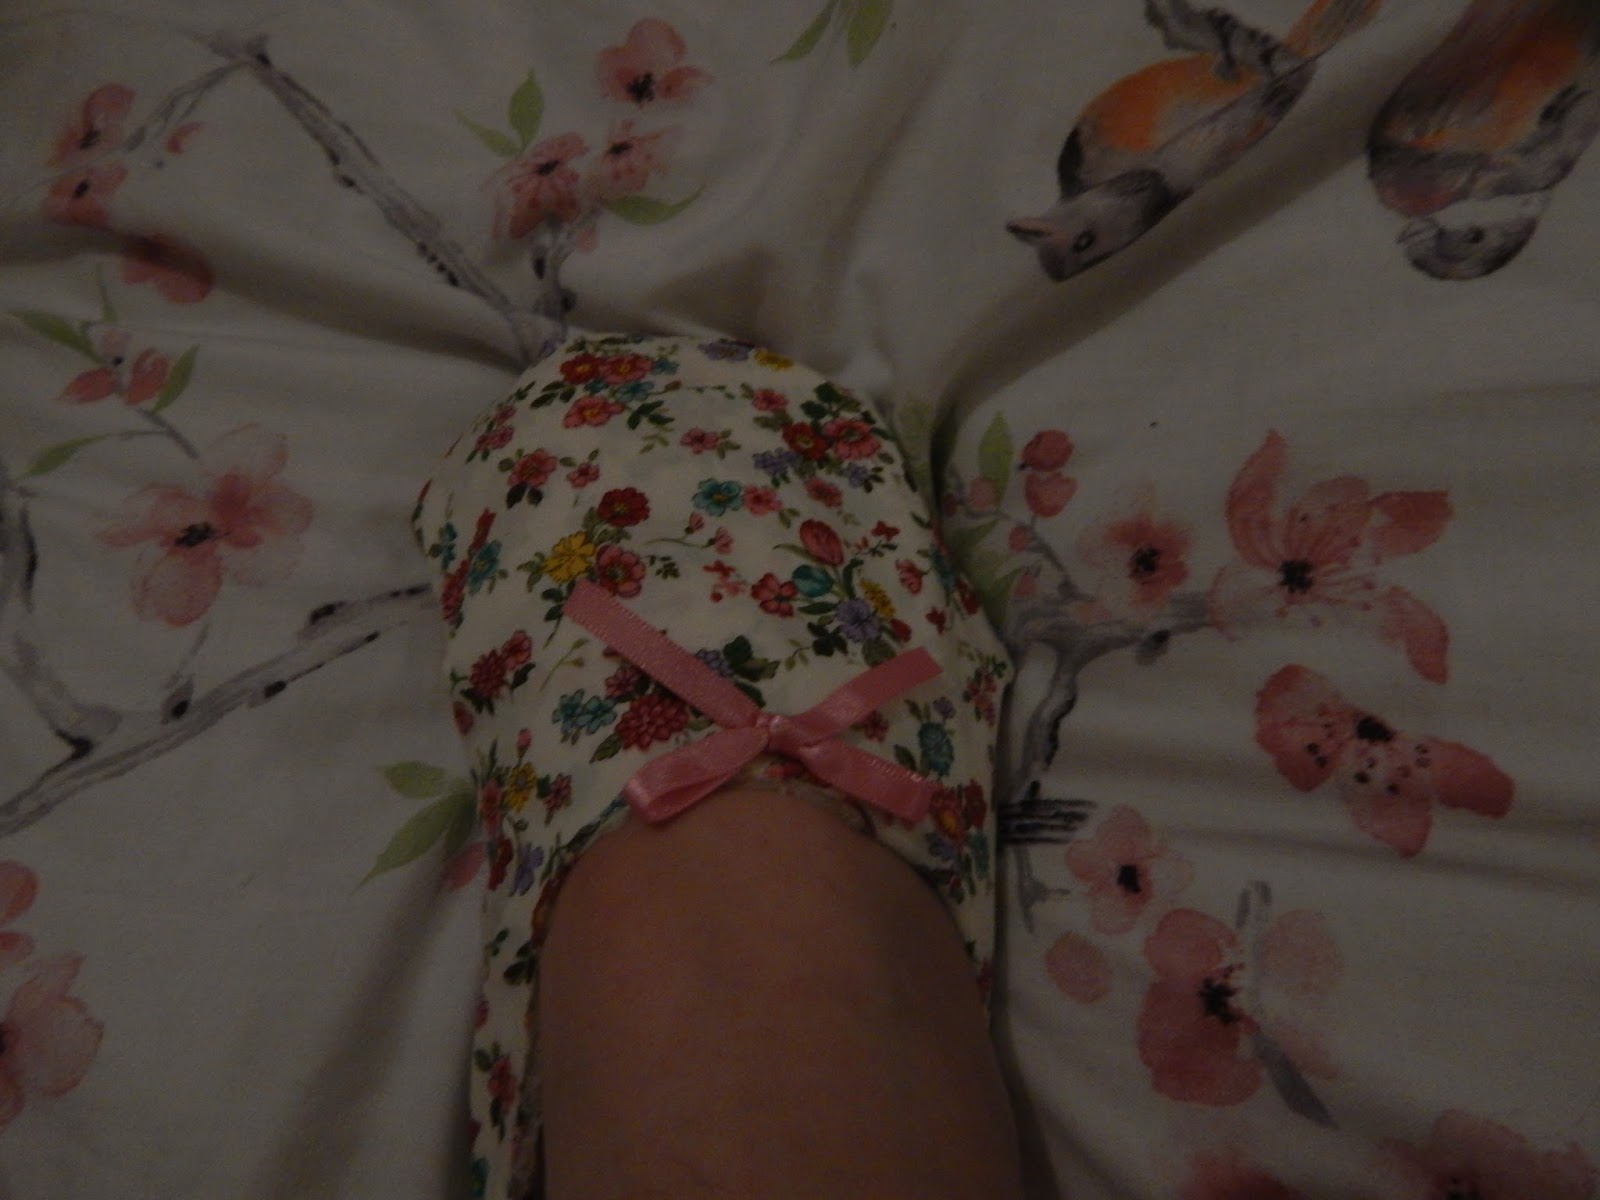

It was a bit more complicated as I thought but once you get the hang of what you are doing then it is smooth sailing.... Well, I say that!
I love the pretty floral pattern of mine, everyone knows I am a sucker for a floral print. What can I say, I am alllll for that flower power.
The lining material I used is super soft so depending on your choice of fabric, hopefully yours will too! Due to the fact I added the little pink bow (I know, how girly is that!), it just makes it look really cute and completes the slippers look I was wanting.
Depending on how much you added on to the base template for the curve of you foot, yours might be higher on the sides than mine.
But with this result, your feet will be the talk of your household!
Well there you have it, your very own home made with love slippers!


Comments
Post a Comment